System Manager—Pull-down Menus
System Manager has 3 pull-down menus: File, View and Help.
File Menu

File | New – allows you to create a new folder, project, survey area, roster or advanced report. IMPORTANT: The new element is created in whichever folder is open at the time.
File | Open – opens the highlighted file on the right.
File | Recharge licenses – recharges the program with usages for subjects.
File | Import licenses from version 3.7 – transfers all licenses remaining in version 3.7 to version 4.0 and resets version 3.7 to 0 licenses. (Not available in Surveys for Small Business)
File | Set System Manager Password – allows you to set or change the System Manager password.
File | Exit – exits System Manager.
View Menu

Use View to open the following folders: Resources, Survey Library, Rosters, Advanced Report, and Projects.
View | WebResponse – takes the administrator to the 20/20 Insight Administrator Login page on the World Wide Web.
View | PowerUser (not available in Surveys for Small Business) – takes the administrator to the 20/20 PowerUser, a rich resource for learning about 360-degree feedback and implementing all aspects of the survey process. It provides case studies, articles and facilitator resources for conducting workshops for participants.
View | Options – Use this option to set defaults in the General tab, WebResponse tab and Reporting tab. See detailed instructions below.
View | Options | General

Organization Name – Enter your organization name. The name appears on the cover of feedback reports under the caption Prepared under License by. See the example below.
Prepared under license by
Your Company Name
Copyright © 1994-2008, Performance Support Systems, Inc.
View | Options | WebResponse

Use this tab to set up the program for use with WebResponse.
| 1. |
Click Test URL to ensure 20/20 Insight connects with WebResponse. |
| 2. |
At the 20/20 Insight Administrator Login, type your Username and Password. The following message will appear on the WebResponse site when the connection is made: |
 Viewing this page confirms that System Manager is successfully connected to WebResponse. Viewing this page confirms that System Manager is successfully connected to WebResponse.
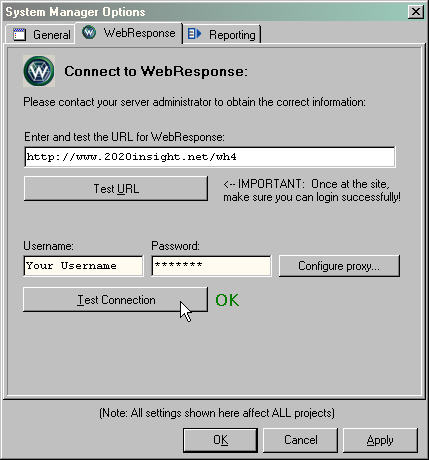
| 3. |
Enter your Username and Password. |
| 4. |
Click Test Connection to ensure 20/20 Insight connects to the WebHost service through the synchronize function. OK will appear next to the button when the connection is verified. (If OK does not appear when you click Test Connection [this rarely happens], check that your username and password is entered correctly and refer to Configuring a Proxy Server on the next page.) |
View | Options | WebResponse - Configuring a Proxy Server
If OK does not appear when you click Test Connection, your organization may be using a proxy server. Contact your IT department to determine if a proxy server is being used. If a proxy server is being used, your IT department or computer specialist will need to fill in the proxy server configuration settings.

1. |
Click Configure proxy. The Proxy Server Configuration box appears. |
2. |
Fill in the proxy server information. Note: Your IT department assigns your Username and Password for the proxy server. |
| 3. |
Click OK. The WebResponse tab will appear. |
| 4. |
Click Test Connection. OK will appear next to the button when the connection is verified. |
If OK still does not appear when you click Test Connection, contact PSS Technical Support at 800-488-6463, x1.
View | Options | Reporting

Set desired preferences for printing reports:
- Uncheck the boxes containing printing preferences you do not want to use.
- Print a coversheet and contents page for all reports
- Print table of contents
- Show page numbers on report
To display your company logo on the coversheet (see specifications below):
- Click “View”
- Click “Options”
- Select the “Reporting” tab
- Verify that “Print a coversheet ...” and “Display logo on coversheet” are checked.
- Click on the graphic-square to the right of “Print a coversheet and “Contents” page for all reports”
(It might say “Click to load image.”)
- A navigation window will open.
- Browse to location of the desired image.
Image Specifications:
• Bitmap file - .bmp
• May be as large as 3” x 5”
• 150 dpi
- Highlight the image.
- Click “Open”
- The logo will appear in the image box.
- Click “OK”
This image will be used in ALL Reports until a new change is made.
Select Printer – Choose the printer you wish to use for printing reports.
View | Options | Apply Button

After you have completed setup:
- Click Apply.
- Click OK.
Help Menu

Help | Index – takes the administrator to the 20/20 Insight Overview.
Help | System Manager – takes the administrator to System Manager instructions.
Help | Project – takes the administrator to Project Manager instructions.
Help | WebResponse – takes the administrator to WebResponse instructions.
Help | About – takes the administrator to copyright information for 20/20 Insight.
Help | Index

Overviews of the three major components are displayed, along with links to orientation videos.
You may view the overview of a major component by clicking on the component name, such as System Manager.
You may view an orientation video by clicking on the link, such as Watch System Manager Overview Video.
Clicking one of the tabs across the top will take you to the online help for that topic. |