| |
Step 1: Participants/Rosters
Step 2: Relationships
Step 3: Scales
Step 4: Items
Step 5: Respondent Selection
Step 6: Assessment
Step 7: Reporting
Synchronize
WebResponse
General Questions |
|
20/20 Insight FAQ's
Here are some of 20/20 Insight's most frequently asked questions. If you can't find what you are looking for, please call technical support at 1-800-488-6463 ext. 1
or email us at Tech@2020Insight.net and we will be glad to help you.
Step 1: Participants/Rosters
- How do I change an employee's name if they have an unlimited usage license assigned?
Please call technical support at 1-800-488-6463 extension 1. If an employee has gotten married or there is a spelling error we can change their name.
- I'm trying to import an Excel spreadsheet but it's not working, what should I do?
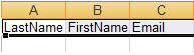
There are a few things that you need to make sure are set up properly when you import an Excel spreadsheet. The first cells in column A, B and C must be formatted with LastName, FirstName and Email respectively. Take note of the spelling of the column headers because they must be exactly as they appear in the image with no spaces. If these are incorrect the import function will show a blank list when the spreadsheet is imported. Please refer to the image below.
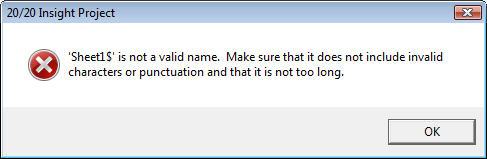
The sheet must be named the default name, Sheet1. Any other name will result in the error shown below.
- I would like to view the survey online but I don’t want to set myself up as a respondent. What should I do?
20/20 Insight GOLD 4.0 includes a Test Subject that comes with an unlimited usage license assigned. To import Test Subject into your current project:
- Click Step 1: Participants.
- Click the Browse button, which is the yellow folder icon.
- Double-click the Rosters folder.
- Double-click Test Subject Roster.
- On the following screen, click the checkbox next to Subject, Test.
- Click Import.
- The Test Subject gets imported into Step 1 of the project and is automatically assigned a self-assessment. Make sure you put your email address in the email field for Test Subject so that you will receive an invitation to the survey.
Step 2: Relationships
- Why would I need relationship abbreviations?
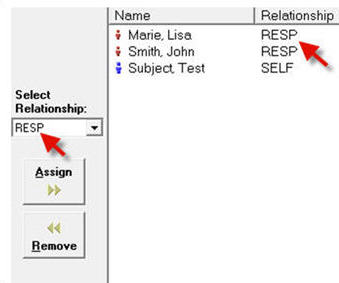
The abbreviations are needed to perform subject respondent selection in Step 5. The reports also display bar graphs with the relationship abbreviation instead of the full relationship name. Please see the below graphic demonstrating this. Also, in subject respondent selection the relationship assignments are based on abbreviations. This is shown below.

Step 3: Scales
- I can’t see a scale when I log in to WebResponse as a respondent, what should I do?
This is usually because a relationship isn’t associated to a specific scale. For example, the OTHER relationship isn’t designated to rate the survey on an AGREEMENT scale. If this were the case, the respondent wouldn’t see the scale when they log in to the survey. Here is the procedure to fix this so that all respondents will be able to view the scale.
- In step 3 double click the scale name. A window appears that says Edit Scale with three tabs across the top. These are Properties, Associated Relationships and Associated Categories.
- Click on the Associated Relationships tab.
- Under the heading, “Which types of RELATIONSHIPS do you wish to assess this scale?” mark all of the checkboxes.
- Click Save.
- Synchronize. You will now be able to log into WebResponse and see the scale.
- Why can’t I change the scale range?
You cannot change a scale range if the project has already been started and data is present. This is to avoid data conflicts between the web server and the client project file.
Step 4: Items
- How do I move an item if I put it in the wrong category?
- Moving items in 20/20 Insight GOLD version 4.0 is very easy.
- Click Step 4: Items.
- Click and hold the item that you want to move.
- Drag the item under the category that you want and release the mouse button.
- Synchronize your project to display the changes online.
You can also move full categories of items by clicking the category name and dragging it to where you want.
- What should I do if I don't see my comment boxes online when I'm logged in as a respondent?
- Click on Step 4: Items
- Click the link that says, "Edit project comment options (0)."
- Follow the wizard to create up to three comment prompts.
- Syncrhonize the project.
- Log in to the survey again to verify the changes were made.
Step 5: Respondent Selection
- What can I do if I accidentally assigned a respondent the incorrect relationship?
- Double-click the subject's name in Step 5: Respondent Selection.
- On the right-hand side, under the heading "# Assigned:" right-click the respondent's name.
- Click the appropriate relationship from the menu.
- Click Save.
- The relationship I need to assign a respondent isn't in the middle column, what should I do?
Ensure that the relationship that you need to assign in Step 5 is created in Step 2: Relationships.
Step 6: Assessment
- I'm unable to print out a paper assessment. When the print preview screen appears there is a blank page...
This is due to a category in Step 4 not having a scale associated properly within the category.
- Click on Step 4: Items.
- Double-click each category heading.
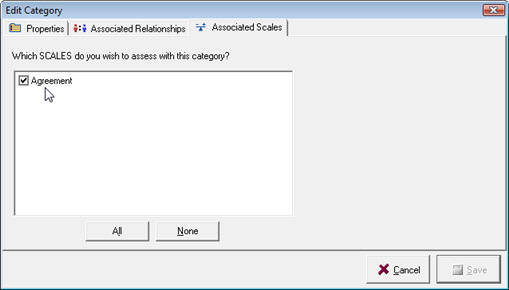
- Under the tab Associated Scales, ensure that at least one scale is associated with the category. Please refer to the image below:
- Click Save
- Re-print your paper assessment.
Step 7: Reporting
- How do I customize a report section?
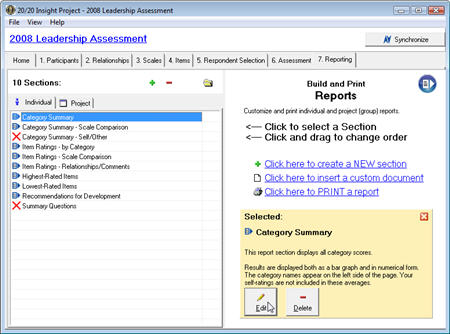
There are two ways to customize a report section. First, you can double-click the report section you want to customize in Step 7. The second way to customize a report section is to left-click the report section and choose Edit in the bottom right hand corner. Please refer to the following image.
To learn more about the different customization options please refer to the following link: http://www.2020insight.net/40/Help/reporting/customizeReport.asp
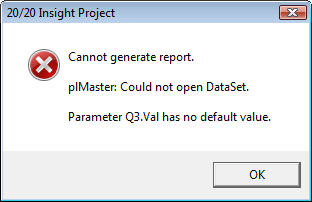
- When I try to print a report I get an error that parameter q3.val has no default value, what should I do?
This error is a direct result of customizing a report section to sort on a column of data that isn't used. Here is an image of what the error will look like on your screen.
To fix this error, follow these steps:
- Print each report section individually until you reproduce the error.
- After finding the report section, click it in Step 7 and choose the Edit button.
- Click the Next button until you come to a screen that looks like the image below.
- Change the option under, "Which column do you want to sort on?" to First column or second column.
- As an alternative you can also choose to show the data in natural order or choose to display a third column of data. To do this, please refer to the online help section entitled reporting.
- Click the Next button until you see the Done button and save the report section.
- Reprint the report section to verify the changes.
- When I try to print a report I get an error that parameter q1.val has no default value, what should I do?
This is a result of customizing a report section without displaying a relationship bar graph or an overall average bar graph. The error looks like the image below.
To fix this error, follow these steps: - Print each report section individually until you isolate the error.
- After finding the report section, click it in Step 7 and choose the Edit button.
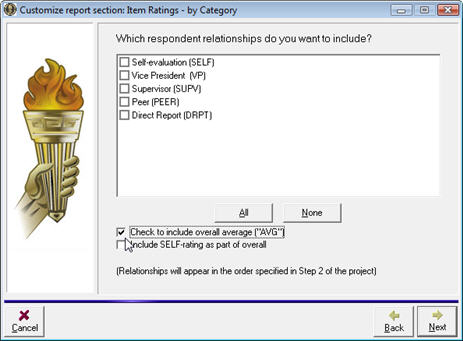
- Click the Next button until you come to a screen that looks like the image below.
- I've created a report section in a previous project and would like to transfer it to the project I'm currently working on...
Transferring a report section from one project to another allows you to keep the customization options you've already created and will save you a lot of work in your new project. Follow the procedure below to tranfer the report section.
- If you are importing a report section into a project that currently has a report section with the same name you will need to delete the report section.
- In the project your currently working on, click the Browse button:

- In the window that appears, double-click the Projects folder. The Projects folder is the default location where project files are stored in 20/20 Insight. If you have stored your desired project in a different folder, please locate it in this step.
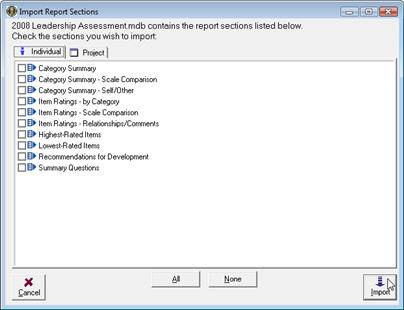
- Double-click the project that contains the report sections you want to transfer. A screen appears that looks like the one below.
- Select the report sections that you would like to import by clicking each checkbox and then click the Import button in the bottom right hand corner.
- Is there a way to print a report that shows only the comments the respondents left for a subject?
A comment only report can be printed by creating a new report section in Step 7 of your project.
- Click the link in Step 7, "Click here to create a new report section."
- On the following screen, give the report a name in the text box that says, "Enter a title for this report section."
- Click the Next button. No changes are needed on the screen that starts with, "What kind of data do you wish to list?"
- Click the Next button. Uncheck all of the boxes on the screen that says, "Which respondent relationships do you want to include?"
- Click the Next button. Check the box that says, "Show Comments." You may also choose to break out the comments by relationship type by checking the box that says, "Group comments for selected relationships ONLY."
- Click Done.
- Print the report section using the, "Click here to print a report," link.
Synchronize
- When I Synchronize, I get HTTP/1.404 not found.
You may need to update your 20/20 Insight software. If you are experiencing any synchronization or connection problems, please visit the Tech Support Update Page, log in using you Adminstrator Usename & Password, and follow the instructions.
WebResponse
- How does a participant retrieve a forgotten password?
When the respondent contacts you, let them know that the login site has a link that will send them a password reminder.
- Am I able to use any e-mail address in the From Email field when sending e-mails from WebResponse?
The e-mail address customized in the From Email field can be any e-mail address you would like. The email address customized in this field will be used by 20/20's e-mail server to deliver any bouncebacks or undeliverables that may occur.
- Help! None of my e-mails are getting delivered to the participants!!!
Please contact the IT department of the organization you are sending the e-mails to and ask them to allow all e-mail from 2020insight.net. If they have further questions, please contact PSS technical support and we will be glad to assist you.
- Can we use any web browser to take our assessments?
WebResponse assessments work in any major browser available today. These browsers include Microsoft Internet Explorer, Mozilla Firefox, Apple Safari and Google Chrome. If you are using a different browser and are experiencing trouble please call PSS technical support.
- Can a respondent log-in after they have completed their survey if they need to adjust their responses?
A respondent may login to the survey as many times as they want until the project site is either closed or taken down from WebResponse by the administrator.
- When a respondent is logging in to the site they are receiving an error message that says, "Username not recognized..."
This error will occur if the respondent was accidentally unassigned as a rater in Step 5 of your project. Please follow the steps below to troubleshoot the error:
- In your project, click on Step 6 and verify that the respondent is assigned to a subject.
- If the respondent isn't assigned to a subject, click on Step 5 and assign the respondent to at least one subject.
- Synchronize your project.
- Inform the respondent to login again to see if the error continues.
- If the respondent continues to get the error please contact PSS technical support.
General 20/20 Insight Questions
- I created a project in System Manager and I'm unable to locate it in the Projects folder.
When you create a file in 20/20 Insight Gold, it is saved in the folder that is currently on display in the right-hand pane. To find your file, check all the folders in 20/20. Click and drag it to the correct folder on the left. If you can't find the file please call PSS technical support.
- I created a project and forgot the password I assigned. Is there any way to retrieve it?
PSS, Inc. has a program that can retrieve forgotten passwords. Please e-mail technical support and attach the project file. We will reply with the project password.
- My software is out of usage licenses, how can I recharge more?
Please call PSS at 1-800-488-6463 ext. 1. The program contains a counter that must be recharged using unique codes that are provided to you by PSS.
- Can I export the data from a project in 20/20 to a Microsoft Excel spreadsheet?
20/20's native data format is Microsoft Access, which can be exported to Excel. PSS provides this service as consulting support and is billed on a case by case basis. If you require assistance querying the desired data please contract PSS technical support.
- When I try and update the software, I receive an error that says, "An error occured while trying to replace the existing file: DeleteFile failed; code 5. Access is Denied."
This error will appear when you run the update installer while 20/20 Insight Gold is open in the background. Close all 20/20 Insight Gold windows and click Retry.
|
|